


 Stainless Steel Flyscreen Mesh
 Pet Paw Resistant Flyscreens and Mesh
 Aluminium Flyscreen Insect Mesh
 Flyscreen Insect Mesh Nylon Heavy Duty


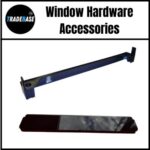
How to replace a chain Window Winder Instructions and Guide
Replacing a chain window winder is a 10-minute job per window once you’ve fitted one before, and about 20 minutes for the first one. You need a Phillips-head screwdriver, a pencil, the new winder, and the existing winder photographed from inside the room before you start. This is the full step-by-step.

Before you start
Get the right replacement first. Hand (left or right), lockable or not, standard 300 mm chain or restricted 100–120 mm, zinc or stainless, and the colour to match the frame. The 60-second decision flow is in the Window Winder Buying Guide. If the window is in a pool zone or above 2 m on a child-occupied floor, you must fit a restricted-chain winder for AS 1926.1 / BCA child-safety compliance — a standard 300 mm winder will fail council inspection.
Tools & parts
- Phillips-head (#2) screwdriver
- Pencil for marking
- The new TradeBase winder — matched to hand, chain length, lock type and colour
- Optional: 16 mm or 20 mm riser bracket if the new winder body sits taller or shorter than the old one
- Optional: cordless drill if you’re upgrading from a non-locking to a locking winder and need new pilot holes
Working at height? If the window is upstairs or above a stairwell, brace the sash with a small block or have a second person hold it before disconnecting the chain — gravity will swing the sash open the moment the chain releases.
The 8-step replacement
Time needed: 10 minutes.
Step-by-step replacement of a chain window winder on Australian awning or casement windows. 10 minutes per window with a Phillips-head screwdriver. Compatible with Whitco, Stegbar, Boral, Dowell, Trend, AWS, Bradnam and Wideline windows.
- Open the window fully
Wind the existing winder all the way out so the sash is at maximum opening. This puts the chain at full extension and gives you slack to work with. Leave the sash open while you work.
- Disconnect the chain from the sash
The chain attaches to a bracket screwed into the bottom edge of the sash. Look for the small clip or pin holding the chain to the bracket — some are spring clips you squeeze and lift off, others are a single screw. Detach the chain. Don’t unscrew the sash bracket itself unless it’s damaged; the new chain will hook onto the same bracket.
- Remove the old winder body
The winder body is fixed to the inside face of the frame with two or three screws — usually one above the handle and one or two below. Unscrew them and lift the body off. If it’s been painted in over the years, run a sharp blade around the edge before unscrewing so you don’t tear paint off the frame.
- Check the mounting holes
Hold the new TradeBase winder body up against the existing holes. The mounting pattern matches every major Australian brand — Whitco®, Stegbar®, Boral®, Dowell®, Trend®, AWS®, Bradnam®, Wideline® — so the screws should drop straight in. If the body sits too high or too low, fit a 16 mm or 20 mm riser bracket.
- Mount the new winder body
Position the body, drop the screws into the existing holes, and tighten them firmly but not so hard you strip the timber or aluminium. The body should sit flush against the frame with no rocking. For lockable winders, the key barrel goes on the bottom or side — check the orientation matches the photo on the product page before final tightening.
- Connect the chain to the sash
Hook or clip the new chain into the sash bracket. The chain runs from the winder body across to the bracket on the opposite side of the sash — if you’ve ordered the wrong hand, the chain will reach the wrong corner and you’ll need to swap. Stop here, take a photo, and email sales@tradebaseaustralia.com.au for a swap if so.
- Test through the full range
Wind the window closed all the way, then back open all the way, then closed again. The chain should run smoothly through the body without binding or skipping. If the chain sags or skips at full extension on a heavy sash, the cause is usually winder body angle — our Anti-Sagging Chain System page explains the engineering and how the keeper plate fixes it.
- Test the lock (if lockable)
Close the window, push the lock button, then turn the key. The handle should fully lock and unlock. If you’ve ordered a multi-pack lockable winder, the same key opens every winder in the order — all TradeBase multi-packs are keyed alike. The 5-pin C4 profile also matches most existing residential lock cylinders, so a single key can run your house, doors and winders.
Common problems
- New winder doesn’t sit flush: the old body height differs from the new. Fit a 16 mm or 20 mm riser bracket.
- Chain reaches the wrong corner of the sash: wrong-hand winder ordered. Swap to the opposite hand.
- Chain binds at full extension: usually the chain is one tooth out at the body. Disconnect, retract by one link, reconnect.
- Sash falls open under its own weight: the friction stay on the sash hinges has worn out. The winder is fine — replace the friction stay.
- Winder squeaks under load: a drop of light machine oil on the chain pivots usually fixes this. Avoid heavy grease — it collects dust.
Pool zone & child safety compliance
Windows opening into a pool zone must be limited to a 100 mm gap under AS 1926.1. Windows in homes with young children that are 2 metres or more above ground level must also be restricted under the BCA child-safety provisions. A standard 300 mm winder will fail inspection. Fit a 100–120 mm restricted-chain winder — e.g. White 100 mm Restricted Stainless. A restricted chain doesn’t remove the requirement for a pool fence; it’s an additional compliance layer.
Stuck on which winder to order?
Email a photo of the existing winder from inside the room with the window open, plus the frame colour, to sales@tradebaseaustralia.com.au — we’ll match you to the right TradeBase replacement in one reply. Or work through the full Window Winder Buying Guide.